Creating an Invoice
Last updated: August 7, 2025
Watch Video Demo Here
Overview
This tutorial guides you through generating professional invoices directly from OneCrew. This feature streamlines your billing process by automatically pulling project details, ensuring accuracy, and saving you valuable time. By following these steps, you can efficiently create and customize invoices for your clients.
Step-by-Step Guide
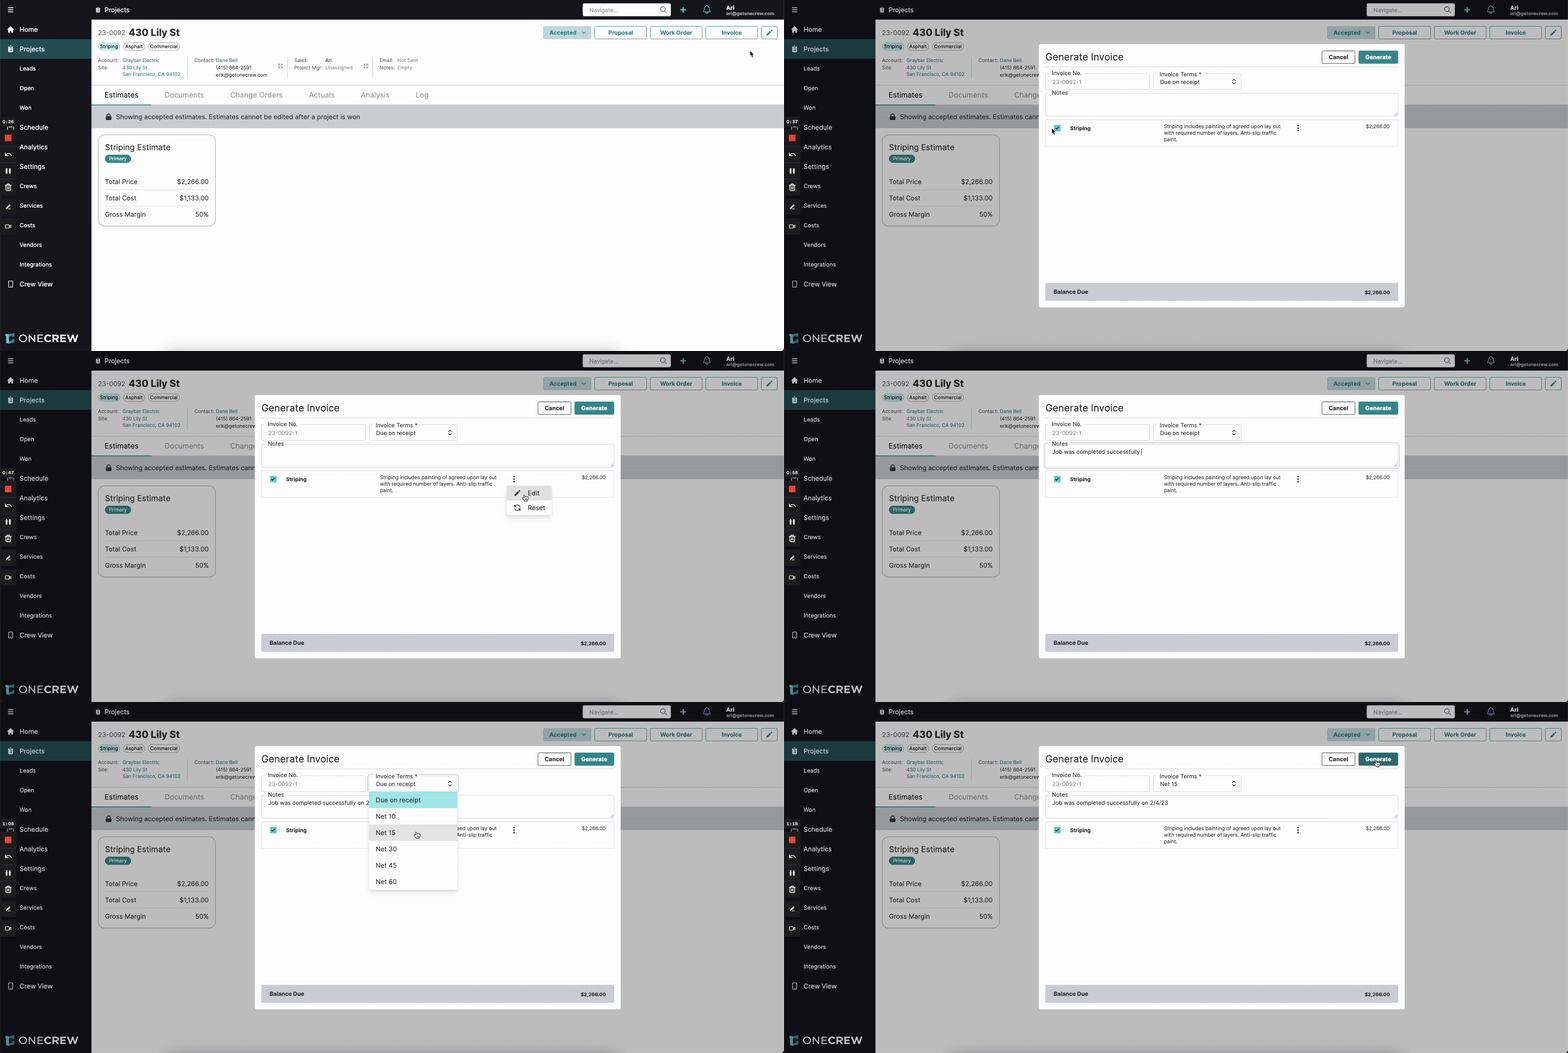
Ensure Project is Accepted:
Navigate to your project from the Active Projects list.
Invoices can only be generated for projects with an Accepted status. If your project is not yet accepted, you'll need to update its status. Look for the project status indicator (e.g., a dropdown showing Estimating) at the top of the project page. Change this to Accepted and confirm any prompts.
Initiate Invoice Generation:
Once the project status is Accepted, an Invoice button will become available, typically located near the Proposal and Work Order buttons.
Click the Invoice button to open the Generate Invoice window.
Configure Invoice Details:
Invoice No.: A default invoice number (often based on the project ID and a sequence number, like
23-0092-1) will be suggested. You can edit this field if your internal numbering system requires it.Services & Change Orders: Review the list of services and any accepted change orders. Ensure the items you wish to bill for are selected (checked).
Description: The description for each service line item defaults to the text used in the project proposal. To modify it for the invoice, click the three-dot menu next to the service and select Edit.
Notes: Add any relevant notes for the customer in the Notes field. This could include details like "Job was completed successfully on [Date]" or other specific information.
Invoice Terms: Select the appropriate payment terms from the Invoice Terms dropdown (e.g., Due on receipt, Net 15, Net 30). This selection will automatically calculate and display the Date due on the final PDF invoice.
Generate and Review PDF:
After configuring all details, click the Generate button.
A PDF invoice will be created and displayed in a new view. Carefully review all information for accuracy:
Your company logo and details.
The project name (often used as the invoice title, e.g., "430 Lily St Invoice").
Key invoice data: Invoice #, Date (issue date), Terms, and Date due.
Any Notes you added.
"Pay to" information (your company).
"Bill to" information (client contact details).
The listed services, their descriptions, and prices, ensuring the Balance Due is correct.
Insight: Designating a specific Billing Contact for a project (see Step 5) ensures your invoices are always addressed to the correct person or department, even if they differ from the primary project contact. This proactive step can reduce confusion and help expedite payments.
Specify "Bill To" Contact (Optional but Recommended):
By default, the "Bill to" field on the invoice uses the Primary Contact associated with the project.
If you need to send the invoice to a different person or accounts payable department, you can set a specific Billing Contact. To do this, navigate back to the project details page.
Look for an option to edit the project's contact information (often a pencil icon next to the displayed Contact name).
In the Contacts modal that appears, you'll find a field to assign or select a Billing Contact. Make your selection or add the new contact.
Click Save. If you've already generated an invoice, simply regenerate it (repeat steps 2-4), and the "Bill to" field will now reflect the updated Billing Contact.
Troubleshooting
Cannot Generate Invoice / Button Disabled or Missing:
Issue: The Invoice button is not visible, is greyed out, or you see a message like "Invoices cannot be created until a project is accepted."
Solution: Confirm the project's status. As outlined in Step 1, the project must be set to Accepted before an invoice can be generated. Update the project status if necessary.
Invoice "Bill To" Field Shows Incorrect Contact:
Issue: The invoice is addressed to the wrong person or department.
Solution: This usually means either no specific Billing Contact was set, or an incorrect one was assigned. Follow Step 5 to edit the project's contact information and set or update the Billing Contact. After saving the changes, regenerate the invoice to reflect the correct "Bill to" details.