Setting Up Quickbooks Integration
Last updated: August 7, 2025
Overview
Connecting your OneCrew account to QuickBooks Online streamlines your invoicing process. This powerful integration allows you to push invoices directly from OneCrew projects to your QuickBooks account, ensuring your financial data is accurate and up-to-date. This tutorial will walk you through the initial setup, configuring essential default settings, and mapping your services and customers for smooth financial operations.
Step-by-Step Guide
1. Connect to QuickBooks Online
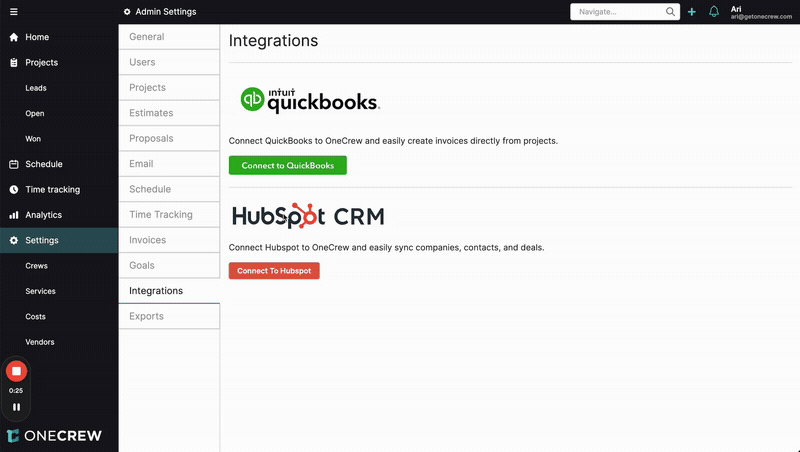
Navigate to Settings in the left-hand menu.
Under Admin Settings, select Integrations.
Click the green Connect to QuickBooks button.
You will be redirected to QuickBooks. Follow the on-screen prompts to log in to your QuickBooks Online account and authorize the connection with OneCrew.
Insight: Direct QuickBooks invoice creation saves time and reduces errors.
2. Configure Default Settings
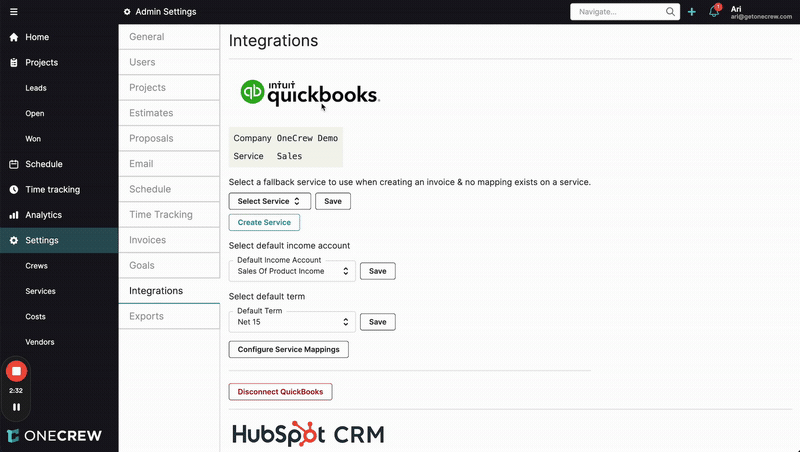
Once connected, you'll be returned to the OneCrew Integrations page. Here, you can configure default settings that will apply to invoices pushed to QuickBooks:
Default Fallback Service: Under "Select a fallback service...", choose a service from the dropdown (e.g., "Sales"). This service will be used on invoices if a specific OneCrew service isn't mapped to a QuickBooks service. Click Save.
Default Income Account: Under "Select default income account", choose an account from the dropdown.
Important: Your chosen QuickBooks income account must be of the type "Service/Fee Income". Click Save.
Default Term: Under "Select default term", pick your standard payment terms from the dropdown (e.g., "Net 15"). Click Save.
3. Configure Service Mappings

To ensure your OneCrew services are correctly reflected on QuickBooks invoices, you need to map them:
Click the Configure Service Mappings button. A modal titled "OneCrew Services to QuickBooks Services" will appear.
For each OneCrew Service listed on the left, select the corresponding QuickBooks Service from the dropdown on the right. Your existing QuickBooks services will populate the dropdown.
If a corresponding QuickBooks service doesn't exist, you can create one directly:
Type the desired name for the new service in the dropdown field (e.g., "Concrete Sidewalks").
Click the New button next to the dropdown. This creates the service in QuickBooks Online and maps it.
Once all services are mapped, click Save at the top right of the modal.
Pro Tip: Accurate service mapping ensures detailed financial reporting.
4. Link OneCrew Accounts to QuickBooks Customers

For invoices to be assigned to the correct customer in QuickBooks, link your OneCrew accounts:
Navigate to the specific Account page in OneCrew (e.g., by searching for the account name in the top navigation bar).
On the account page, click the Link With QuickBooks button.
In the "Link OneCrew Account with QuickBooks Customer" modal, search for the corresponding customer in QuickBooks by typing their name in the Customer field.
Select the correct customer from the search results to establish the link. The OneCrew account page will then display the linked QuickBooks customer (e.g., "QuickBooks: Test Customer 2").
Insight: Linking associates invoices with correct QuickBooks customers, aiding payment tracking.
Troubleshooting
Incorrect Default Income Account: If you encounter issues saving the default income account, ensure the selected account in QuickBooks is an "Income" account, and its "Detail Type" is set to "Service/Fee Income" or a similar service-related category.
Unmapped Services on Invoices: If a OneCrew service on an invoice hasn't been explicitly mapped, the Default Fallback Service (configured in Step 2.1) will be applied to that line item in the QuickBooks invoice.
Customer Not Found During Linking: If you cannot find a customer in the "Link OneCrew Account with QuickBooks Customer" modal, first verify that the customer exists in your QuickBooks Online account with the correct spelling. If they don't, you'll need to add them in QuickBooks before attempting to link again.