Customized Proposal Sections
Last updated: October 13, 2025
Watch Video Demo Here
Overview
This article provides a comprehensive guide to the advanced proposal customization features within OneCrew. These enhancements offer greater control over the structure, content, and visual presentation of your proposals, enabling you to create more professional, persuasive, and client-specific documents.
The primary purpose of these features is to empower users to tailor their proposals beyond standard templates. This includes the ability to add custom content sections, reorder existing sections, and utilize rich text formatting options within service descriptions. The scope covers both global proposal settings (affecting all new proposals) and individual proposal adjustments.
Key benefits include:
Enhanced Professionalism: Create polished, branded proposals that reflect your company's quality.
Improved Clarity: Structure information logically and highlight key details effectively.
Increased Persuasiveness: Add compelling content, images, and videos to better showcase your services.
Time Savings: Set up default custom sections to be automatically included in new proposals.
Greater Flexibility: Adapt proposals easily to specific client needs or project types.
Configuration
You can configure proposal customizations at both a global level (Default Proposal Sections) and on a per-proposal basis.
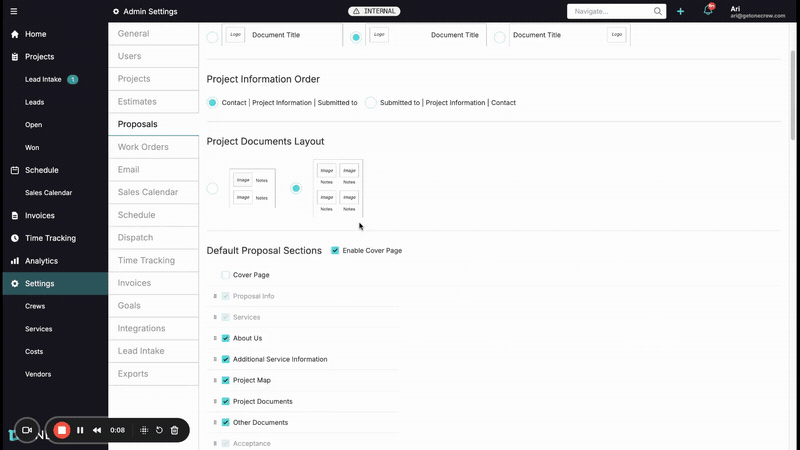
Default Proposal Sections
These settings are found under Settings > Proposals and allow you to define the standard structure and content for all newly created proposals.
Key configuration options include:
Section Divider Color: Choose a color for the lines that separate sections in your proposal, aiding visual organization and branding.
Company Logo & Title Alignment: Select the alignment (left, center, right) for your company logo and the proposal title.
Project Information Order: Customize the display order of key project details like Contact, Project Information, Submitted to.
Project Documents Layout: Choose how images and notes are displayed within the project documents section.
Default Proposal Sections List:
This list shows all available sections, both standard (e.g., Cover Page, Proposal Info, Services) and custom.
Enable Cover Page: A checkbox to toggle the inclusion of a cover page by default.
To add a new custom section:
Click the Insert Section button.
A "Custom Section" pop-up will appear.
Enter a Title for your new section (e.g., "Our Process," "Why Choose Us?").
Use the rich text editor to add the default content for this section. You can format text (bold, italics, underline), change text color, adjust font size, create bulleted or numbered lists, and insert links, inline images, or embed videos.
Click Done. The new custom section will be added to the list.
Reordering Sections: Drag and drop sections within the list to set their default order in new proposals.
Enabling/Disabling Sections: Use the checkboxes next to each section to determine if it should be included by default in new proposals.
Editing/Deleting Custom Sections: Click the pencil icon to edit an existing custom section or the 'x' icon to delete it.
Default Cover Page Photo: Select an image to be used as the default cover page photo for new proposals.
Individual Proposal Customization
When editing an existing proposal or creating a new one from a project, you have further customization options:
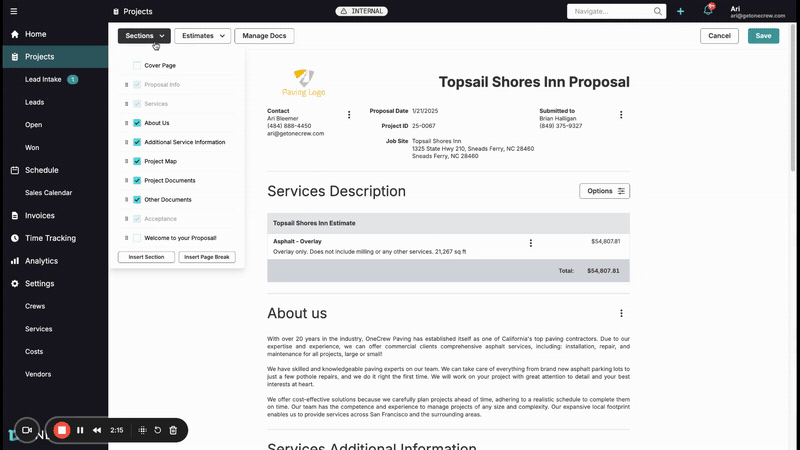
Managing Sections:
Click the Sections dropdown in the proposal editor.
Toggle the checkboxes next to each section name (standard or custom) to include or exclude it from the current proposal.
Custom sections added in Settings will appear here, and you can choose to include them. You can also reorder sections for the specific proposal by dragging them in this list.
Editing Service Descriptions:
Within a service line item (e.g., "Asphalt - Overlay"), click the three-dot menu and select Edit Description.
The rich text editor allows for:
Font Size: Choose from Sub-Text, Normal, Heading 1, Heading 2.
Font Color: Select from a color palette or enter a HEX code. Recently used colors are saved for quick access.
Text Styling: Bold, italics, underline.
Lists: Bulleted and numbered lists.
Links: Insert hyperlinks.
Inline Media: Add images or embed videos directly within the description.
Pro Tip: Regularly review and update your default proposal sections in Settings to reflect any changes in your services, company information, or common client inquiries. This ensures new proposals always start with the most current and relevant information.
Use Cases
Understanding when and why to use these advanced proposal customization features can significantly improve your sales process and client communication.
Standardizing Important Information:
Include a default "Terms and Conditions" or "Company Overview" section in every proposal.
Add a personalized "Welcome" message with contact details for a consistent client experience.
Highlighting Specific Services or Expertise:
Create custom sections for case studies, testimonials, or detailed explanations of specialized services.
Use rich text formatting (e.g., bolding, color, headings) within service descriptions to draw attention to unique selling points or critical details.
Addressing Client-Specific Needs:
Add a unique section to a proposal to address specific concerns or requirements raised by a particular client during initial discussions.
Incorporate inline images or embed videos within service descriptions to visually demonstrate a proposed solution or a relevant past project.
Improving Proposal Flow and Readability:
Reorder sections to present information in the most logical sequence for a particular client or project type.
Use different font sizes and styles to create a clear visual hierarchy, making proposals easier to scan and understand.
Maintaining Brand Consistency:
Ensure all proposals adhere to company branding guidelines through consistent section layouts and default content.
Set a default section divider color that aligns with your brand.
Insight: Tailoring proposals demonstrates attention to detail and a client-focused approach, which can be a key differentiator in winning projects.
Examples
Here are some real-world examples demonstrating how these customization features can solve problems or add value.
Basic Usage: Standard Welcome Message
Problem: You want every client to receive a warm, personalized greeting and clear contact information at the beginning of their proposal. Solution:
Navigate to Settings > Proposals.
Under Default Proposal Sections, click Insert Section.
Title the section "Welcome to Your Proposal!"
In the content editor, write a welcoming message, for example: "We're excited to propose this work for you. Once you have a chance to review this proposal, please reach out to us at (your phone number) or reply to this email with any questions."
Click Done.
Drag this new "Welcome to Your Proposal!" section to the top of the list, perhaps just below the Cover Page or Proposal Info.
Ensure the checkbox next to it is ticked.
Value: All new proposals will now automatically include this friendly, informative introduction, enhancing client experience and ensuring they know how to reach you.
Advanced Usage: Detailed Service Clarification with Visuals
Problem: A specific service, like "Asphalt Overlay," often generates similar client questions about the process or materials used, and you want to proactively address these and make the description more engaging. Solution:
When editing a specific proposal, navigate to the "Asphalt - Overlay" service line item.
Click the three-dot menu and select Edit Description.
Use the rich text editor to enhance the description:
Change "Overlay only." to a more prominent Font Color (e.g., your brand's secondary color) and make it Bold.
Use Heading 2 for sub-sections like "Process Overview" or "Materials Used."
Create a bulleted list for key steps or benefits.
Click the Insert/edit image icon to add a small inline photo of a recently completed overlay project, or the Insert/edit media icon to embed a short video explaining the benefits of your overlay technique.
Adjust the font size of less critical, detailed specifications to Sub-Text.
Click Done.
Value: The service description is now much more informative, visually appealing, and can proactively answer client questions. This reduces back-and-forth communication and builds confidence in your expertise by showcasing your work directly within the proposal.
Advanced Usage: Custom Section for Project-Specific Exclusions
Problem: For certain types of projects, there are common items or services that are explicitly not included, and you need to make this very clear to avoid misunderstandings. Solution:
In Settings > Proposals, create a custom section titled "Important Exclusions & Assumptions."
In the content, add placeholder text like: "[Detail any specific items, services, or conditions not included in this proposal. Be explicit to avoid future discrepancies. E.g., 'Removal of existing landscaping is not included unless specified elsewhere.' or 'Permit fees beyond standard city applications are the responsibility of the client.']"
Save this section but leave it unchecked by default (so it's not in every proposal).
When creating a proposal for a project where this is relevant:
Open the proposal editor.
Click the Sections dropdown.
Check the box next to "Important Exclusions & Assumptions" to add it to the proposal.
Click into the section within the proposal to edit the placeholder text and tailor it with the specific exclusions for that project.
Value: This provides a dedicated, clear space to manage client expectations about what is and isn't covered, reducing the risk of disputes and ensuring transparency. The ability to add it selectively keeps other proposals uncluttered. Learn more about managing proposal content [add link to relevant article].