Adding Photos & Documents to Proposals
Last updated: August 7, 2025
Watch a Video Demo Here
Overview
Keeping your project-related documents organized and accessible is crucial for efficient workflow and clear communication. This tutorial will guide you through the process of attaching documents like PDFs and images to your projects, and then seamlessly incorporating them into your proposals. This structured approach helps you present comprehensive and professional proposals to your clients.
Step-by-Step Guide
Managing Documents in Your Project

Before you can add documents to a proposal, they must first be uploaded to the associated project.
Navigate to the Projects section from the main menu and select your desired project.
Click on the Documents tab. This is your central hub for all project-related files.
You can create folders (e.g., "Before Photos," "After Photos," "Site Plans") by clicking the New Folder button to keep your documents organized.
To add files to the project:
Drag and Drop: Simply drag PDF files or images from your computer and drop them into the main document listing area. A blue highlighted zone will appear to indicate where the file will be uploaded.
Upload Button: Alternatively, click the Upload button located in the top right corner of the Documents tab. You can then browse and select files from your computer.
Once uploaded, your documents will be listed, showing their name, who created/uploaded them, and the upload date.
Pro tip: Organize your documents with clear names and use folders within the project's Documents tab. This preparation will make it much faster to find and select the correct files when building your proposal.
Adding Documents to Your Proposal
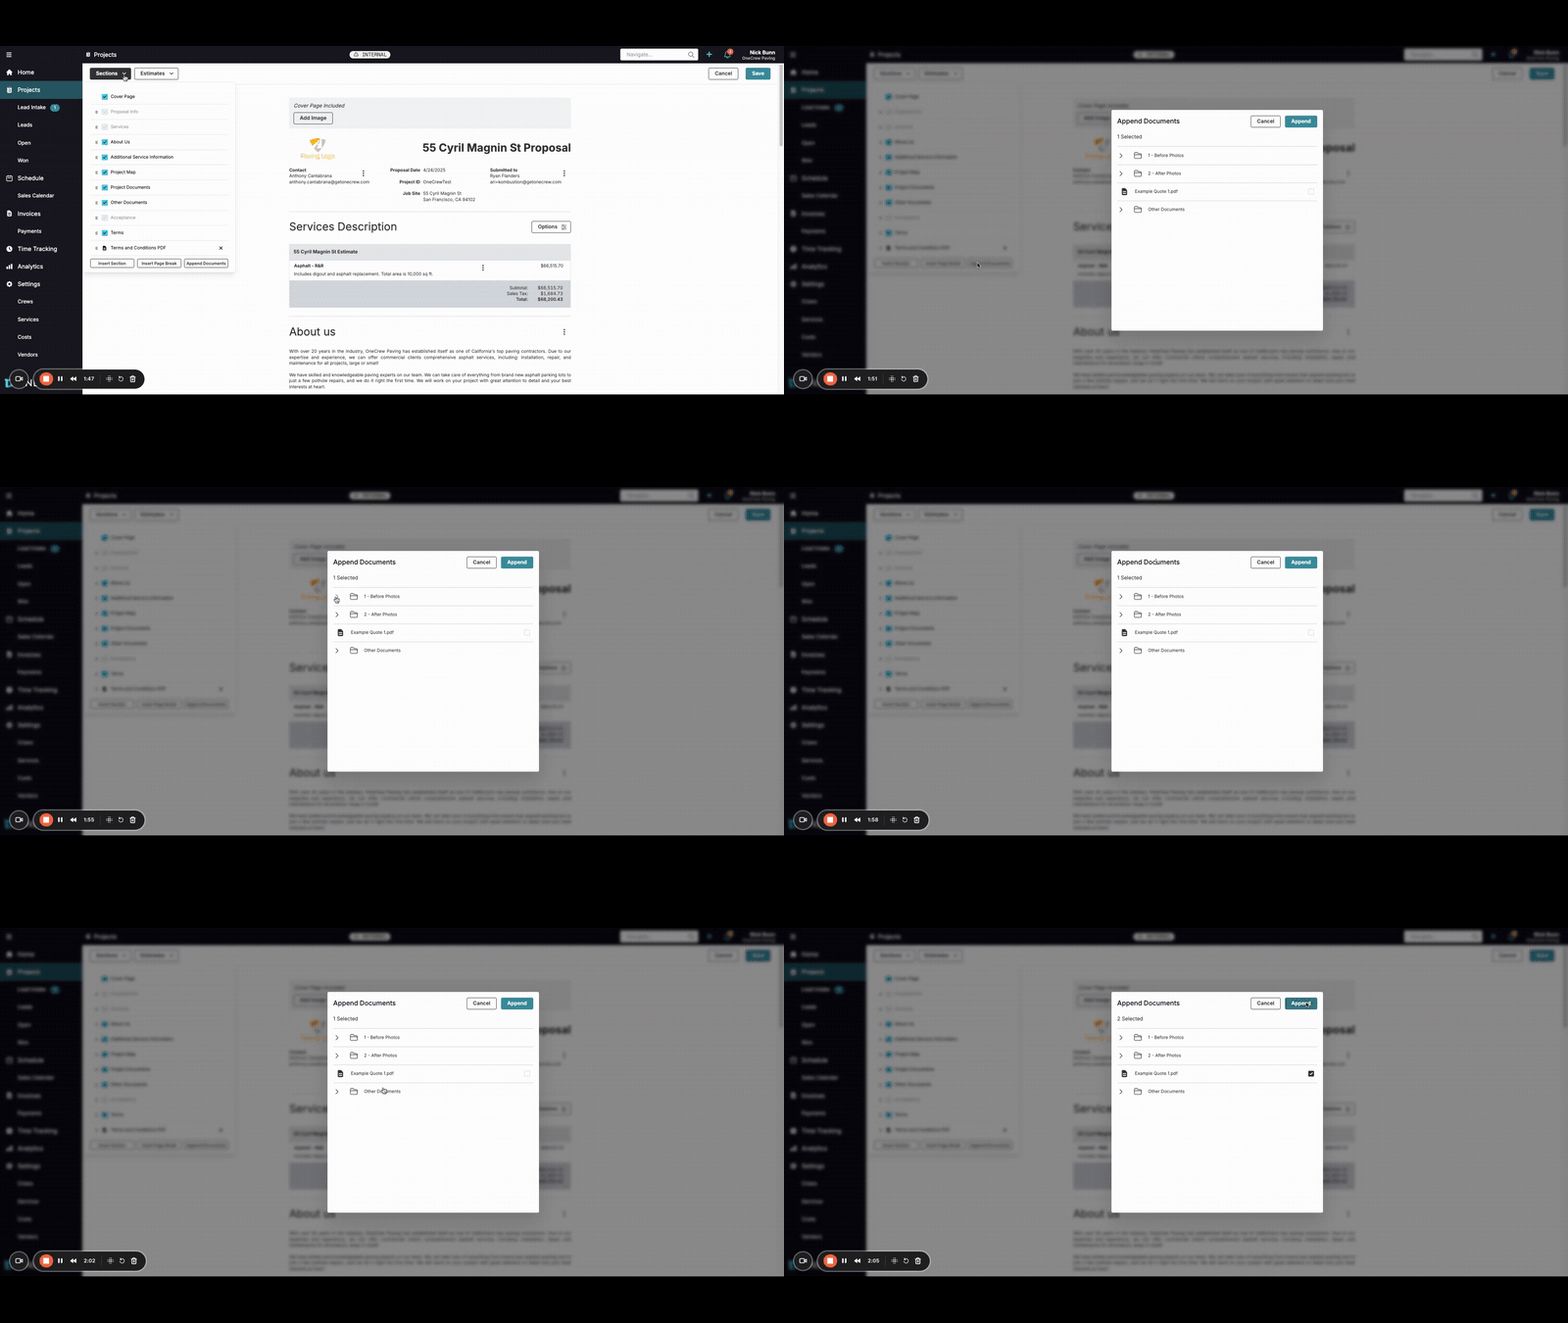
With your documents neatly stored in the project, you can now add them to your proposals. The previous "Manage Documents" button in proposals has evolved into two distinct, more focused methods:
1. Appending Documents (PDFs or Full Images as Separate Pages/Sections)
This method is used to add documents like terms and conditions, detailed specifications, or full-page images as separate pages or sections within your proposal.
Open the proposal you wish to edit. Ensure you are in the editing mode.
In the top left corner of the proposal editor, click the Sections button. This will open a panel listing all current sections of your proposal.
At the bottom of this Sections panel, click the Append Documents button.
An "Append Documents" modal window will appear, displaying the folders and files available from your project's Documents tab. You can click the small arrow next to a folder name to expand it and see its contents.
Locate the PDF(s) or image(s) you want to add. Select them by clicking the checkbox to their right.
Click the green Append button in the modal. The selected documents will now be added to your proposal, typically appearing at the end of the Sections list. You can drag and drop these appended items within the Sections panel to reorder them. Images can generally be placed more freely, while PDFs often work best at the beginning or end of the proposal.
2. Adding Photos with Notes to the 'Project Documents' Section
This method is ideal for showcasing visual information, like site photos, and including descriptive notes directly alongside them within a dedicated "Project Documents" area of your proposal.

While in the proposal editing view, scroll down through the proposal preview until you find the Project Documents section.
Click the Manage button located to the right of the Project Documents heading.
A "Manage Project Documents" modal will open. This modal is specifically for images; PDF files will appear greyed out and cannot be selected here.
Browse through your project's image files and select the photos you want to include by checking their respective boxes. You can select multiple photos.
Click the Done button. The chosen photos will now populate the Project Documents section of your proposal.
To add a descriptive note to any photo in this section, click the three vertical dots (...) next to the image and select Edit. A text editor will appear where you can type your notes. Click Done to save the note.
Within this section, you can also reorder photos by dragging and dropping them, or remove a photo using the three-dot menu and selecting Delete.
Insight: Utilizing these two distinct methods—appending documents and managing photos in the 'Project Documents' section—provides flexibility. You can attach formal PDF documents as standalone items and also present annotated site photos in a visually engaging way, all within the same proposal.
Troubleshooting
Document Not Appearing for Selection: If you can't find a document when trying to add it to a proposal, double-check that it has been successfully uploaded to the Documents tab of the correct project that the proposal is linked to.
Cannot Add PDF to 'Project Documents' Section: The Project Documents section (managed via its Manage button) is specifically designed for images and their notes. To include a PDF in your proposal, you must use the Append Documents method found under the Sections tab.
Unsure Which Method to Use:
Use Append Documents (via the Sections tab) for: Standalone PDFs (e.g., terms & conditions, detailed specifications, brochures) or full-page images that should appear as separate, self-contained pages.
Use the Manage button within the Project Documents section for: Adding site photos, before/after shots, or any image where you want to include specific notes or captions directly alongside it in a dedicated gallery-style section.