Building Service Templates
Last updated: August 7, 2025
Watch a Video Demo Here
Overview
Service templates are a powerful tool to standardize and accelerate your estimating process. By predefining common services with their associated labor, materials, equipment, and other costs, you ensure consistency, accuracy, and save significant time when building proposals. This tutorial will guide you through understanding the components of a service template and then walk you through creating a new one from scratch.
Step-by-Step Guide
Understanding the Anatomy of a Service Template
Before creating a new template, let's familiarize ourselves with its key components.
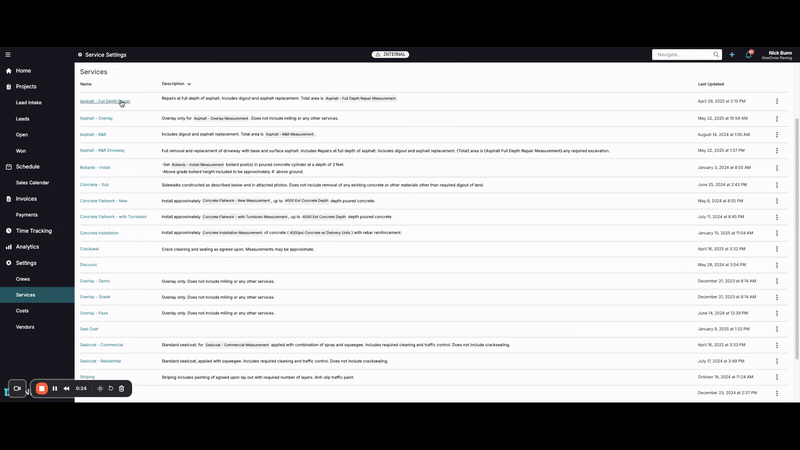
Navigate to Services from the main left-hand menu. Here you'll see a list of your existing service templates.
Click on an existing service template (e.g., "Asphalt - Full Depth Repair") to view its details.
Observe the core elements:
Name & Description: Clearly identifies the service. The description can use template variables (like
{Measurement}) to dynamically insert job-specific details into proposals.Tags: Help categorize and find templates (e.g., "Asphalt").
Measurement Type: Defines how the service is quantified (e.g., Sq Ft, Linear Ft, Each).
Default Margin: A pre-set profit margin applied to the service.
Cost Categories: Templates are broken down into standard cost types:
Labor: Includes crews and individual roles with default hours or quantities.
Materials: Lists necessary materials with default quantities, depths, or auto-calculation rules based on the measurement type.
Equipment: Details required equipment, often with auto-calculated hours based on production rates.
Trucking, Striping, Subcontracting, Other: Additional cost categories to fully define the service.
Proposal Documents: You can link or append standard documents (e.g., Terms & Conditions, brochures) that will be included with proposals using this template.
Insight: Service Templates ensure that every estimate for a particular service includes all necessary cost components, reducing errors and improving consistency across your team.
Creating a New Service Template
Now, let's create a new service template. We'll use "Asphalt Overlay" as an example.
From the Services page, click the New Service button in the top-right corner.
Fill in the Name for your template, e.g., "Asphalt Overlay".
Write a Description. You can use template variables by typing an open curly bracket
{to see available options. For example:Asphalt Overlay for {Measurement} at {Unit Price}.Add relevant Tags (e.g., "Asphalt") to help organize your templates.
Select the Measurement Type from the dropdown (e.g., "Sq Ft"). This is crucial for auto-calculations.
Optionally, set a Default Margin and link to a Quickbooks Service.
Click Edit Notes to add more detailed Proposal Notes (e.g., specific inclusions/exclusions) or Work Order Notes that will appear on respective documents.
Begin adding costs to the relevant categories (Labor, Materials, Equipment, etc.) by clicking Add Cost under each section:
Labor: Search for and add predefined Cost Sets (like "Paving Crew") or individual labor items. Enter Default Quantity for roles (e.g., 2 for Foreman, 5 for Laborer).
Materials: Add materials like "Asphalt" or "Tack Oil". For items like asphalt, you can set a Default Depth (e.g., 2 inches). Quantities for some materials can be set to Auto to calculate based on the Measurement Type and other inputs (like depth).
Equipment: Add individual equipment or Cost Sets (like "Paving Set"). Hours for equipment can also be set to Auto, calculating based on production rates tied to the Measurement Type.
Trucking: Add trucking costs, like "Tri-axle", and specify the Default Quantity of trucks.
Other: Include items like "Mobilization - paving".
Pro Tip: For materials and equipment, utilize the Auto quantity/hours feature where possible. This links costs directly to the job's Measurement Type (e.g., Sq Ft), automatically adjusting quantities and saving manual calculation time.
For each cost item, you can specify if it's Taxable.
Scroll to the bottom to link or append any default Proposal Documents.
Once all details are configured, click Save in the top-right corner.
Your new service template is now ready to be used in your estimates, streamlining your workflow!
Troubleshooting
Issue: Auto-calculated material or equipment quantities seem incorrect.
Solution: Double-check that the Measurement Type for the service template (e.g., Sq Ft) matches the units used in the material/equipment cost item's auto-calculation setup. Ensure any production rates or formulas are correctly defined in the underlying cost item settings. For instance, if your measurement is Sq Ft, but a material's default unit is "meters", the auto-calculation will not work as expected.
Issue: A cost item I expected to be included is missing when I use the template.
Solution: Ensure that the Enable cost selection checkbox for the relevant cost category (e.g., Labor, Materials) is configured as intended. If it's checked, users will need to manually select that cost item when applying the template to an estimate. If it should always be included, ensure this box is unchecked for the category or that the specific item is added without conditions.
Issue: Template variables in the description (e.g.,
{Measurement}) are not populating correctly in the proposal.Solution: Verify the exact spelling and bracketing
{ }of the template variable in the service template's description. Ensure the estimate using this service template has the corresponding information (e.g., a value for square footage if{Measurement}is tied to Sq Ft) entered.