Project Checklists: A Guide
Last updated: August 7, 2025
Overview
Project Checklists are a powerful tool designed to standardize project initiation and execution processes. They allow teams to create reusable templates of tasks or verification points that must be addressed for each project. The primary purpose is to ensure consistency, prevent oversight of critical steps, and improve communication, particularly when relaying important information to field crews via Work Orders.
By implementing Project Checklists, businesses can benefit from:
Enhanced Consistency: Every project follows a standardized set of preliminary steps.
Reduced Errors: Key tasks and information gathering are less likely to be missed.
Improved Preparedness: Sales and project management teams can ensure all prerequisites are met before work commences.
Streamlined Handoffs: Information designated for field crews is clearly communicated through Work Orders.
The scope of this feature includes creating and managing multiple checklist templates, applying these templates (either by default or manually) to individual projects, completing checklist items as the project progresses, and integrating selected checklist information into Work Orders.
Configuration
Setting up Project Checklists involves creating templates that can be applied to your projects. These templates consist of various prompt items that your team will address.
Accessing Checklist Settings
Navigate to Settings from the main menu.
Under the General settings section, click on Projects.
Scroll down to the Checklists section. Here, you'll see a list of existing checklist templates.
Creating a New Checklist Template
Click the New Checklist button.
In the "New checklist" dialog:
Enter a descriptive Name for your checklist template (e.g., "Residential Paving Pre-Start").
For the first item, fill in the PROMPT field (e.g., "Traffic control plan needed?"). This is the question or task.
Optionally, you can pre-fill a common RESPONSE, though this is typically filled out per project.
Check Required if this item must be completed for the checklist to be considered complete.
Check Include in Work Order if this prompt and its response should appear on the project's Work Order for the crew to see.
To add more items to the template, click Add Item and repeat the configuration for each new prompt.
Once all items are added, click Create. The new template will appear in your list of checklists.
Managing Checklist Templates
In the Checklists section under Settings > Projects:
You can create as many checklist templates as needed for different project types or stages.
To set a template as the default for all new projects:
Click the three-dot menu icon next to the desired template.
Select Mark as Default. A "Default" badge will appear next to its name.
Other options available from the three-dot menu include:
Edit: Modify the template's name or items.
Remove Default: If the template is currently the default, this option will be available.
Duplicate: Create a copy of the template to make quick variations.
Delete: Permanently remove the template.
Pro Tip: Create a comprehensive default checklist that covers the most common requirements for your typical projects. This saves time and ensures a baseline level of diligence for every new job created. For specialized projects, you can always add other specific checklists or ad-hoc items.
Use Cases
Project Checklists are versatile and can be adapted to various needs within the project lifecycle. Consider using this feature when:
Standardizing Pre-Job Preparations:
Ensuring all pre-job site verifications are completed, such as confirming site access, checking for hazards, or verifying measurements.
Example: A checklist item "Site access confirmed and clear for equipment?" can ensure the crew doesn't face unexpected entry issues.
Verifying Document Collection:
Making sure all necessary documentation like permits, client sign-offs, or detailed site maps are gathered and attached to the project before work begins.
Example: "All required permits obtained and uploaded?"
Communicating Critical Information to Field Crews:
Relaying specific instructions, safety notes, or client requests directly to the crew via the Work Order.
Example: An item "Special instructions for crew: [Response]" with the "Include in Work Order" option checked, ensures the crew sees this vital note.
Ensuring Quality Control Points:
Implementing checks at various stages, for instance, confirming material orders or pre-installation verifications.
Streamlining Project Close-Out:
Standardizing steps for project completion, like "Final walkthrough with client scheduled?" or "Post-job photos uploaded?"
Insight: Project Checklists act as a safeguard, institutionalizing best practices and critical operational steps. This systematic approach significantly reduces the chances of costly errors or delays caused by overlooked details, ensuring smoother project execution from start to finish.
Examples
Project Checklists provide a flexible way to ensure thoroughness. Here's how they can be applied in real-world scenarios:
Scenario 1: Pre-Job Site Readiness Checklist
Imagine you want to ensure every paving job starts smoothly. You create a "Pre-Job Site Readiness" checklist template.
Template Configuration:
Name:
Pre-Job Site ReadinessItem 1:
PROMPT:
Traffic control needed?Required: Yes
Include in Work Order: Yes
Item 2:
PROMPT:
All maps and other photos attached to Work Order?Required: Yes
Include in Work Order: No (This is an internal check for the office)
Item 3 (added ad-hoc to a specific project later):
PROMPT:
Additional notes for crewRequired: No
Include in Work Order: Yes
Scenario 2: Using the Checklist on a Project
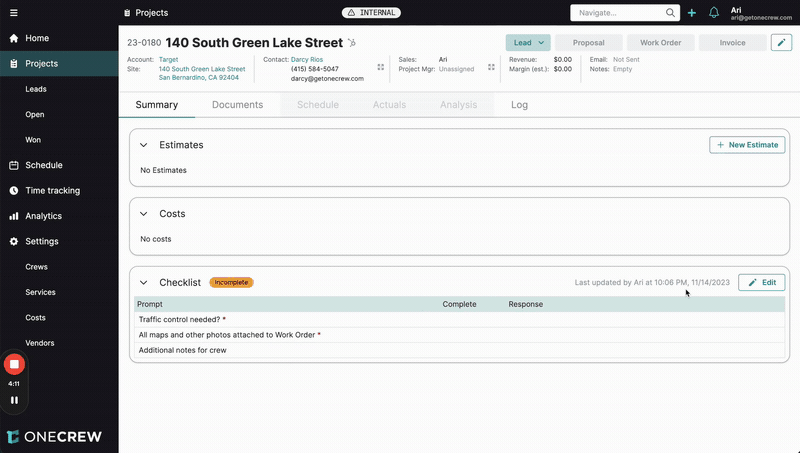
A new project, "140 South Green Lake Street," is created. If "Pre-Job Site Readiness" was set as default, it's automatically applied. Otherwise, it can be added manually during project creation or later.
Initial State:
On the project's Summary tab, the Checklist section appears, likely with an "Incomplete" status because required items haven't been addressed. Prompts marked as required will have an asterisk (*).
Completing the Checklist:
The sales or project manager clicks Edit on the Checklist section.
For "Traffic control needed?": They type "No" in the response field and check the Complete box for that item.
For "All maps and other photos attached to Work Order?": They type "Yes" and check its Complete box.
For "Additional notes for crew": They might leave this blank if there are no specific notes for this job. Since it's not required, it doesn't prevent the checklist from being marked as complete.
They click Save.
Status Update:
The Checklist status on the project summary now shows "Complete" because all required items have been addressed. The system also logs who last updated it and when.
Work Order Integration:
When the Work Order for "140 South Green Lake Street" is generated, a Checklist section will appear on it.
This section will display:
"Traffic control needed?" - Response: "No" (because "Include in Work Order" was checked for this item).
"Additional notes for crew" (because "Include in Work Order" was checked for this item, even if no response was entered).
The item "All maps and other photos attached to Work Order?" will not appear on the Work Order, as it was not marked for inclusion.
This ensures the field crew is aware of critical operational details like the traffic control status and any special notes, directly on their Work Order. Learn more about Work Orders [add link to relevant article].