Duplicate Estimates / Projects with Copy Estimates
Last updated: August 7, 2025
Overview
This tutorial will guide you through the process of copying an existing estimate to a brand new project. We'll also highlight how to use the "Use Project Properties" feature, which intelligently pre-fills your new project's details from the source project. This is incredibly useful for streamlining the creation of similar projects, saving you valuable time and ensuring consistency by reusing estimate structures and project information.
Step-by-Step Guide
1. Locate and Initiate the Copy
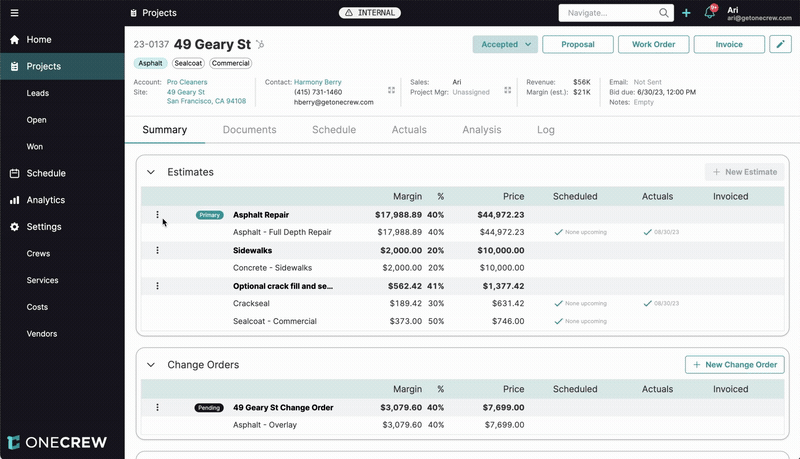
Begin by navigating to the project that contains the estimate you wish to duplicate.
From the project's Summary tab, find the Estimates section.
Identify the specific estimate you want to copy. To its left, click the three-dot menu icon (⋮).
From the dropdown menu that appears, select Copy to project.
Expected Outcome: A modal window titled "Copy to project: [Estimate Name]" will open, presenting options to copy the estimate to an existing project or a new one.
2. Create a New Project Using Copied Properties
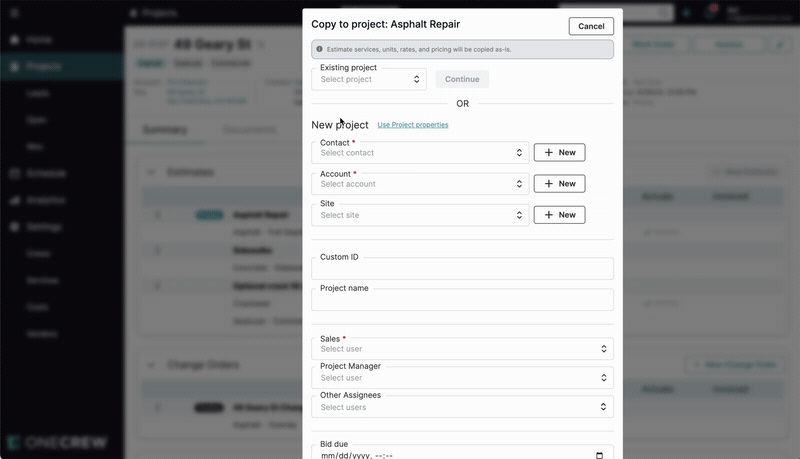
The "Copy to project" modal allows you to either select an existing project or create a new one. For this tutorial, we'll focus on creating a new project.
Ensure the New project section of the modal is visible.
Click the Use Project properties link, located near the top of the New project form.
Insight: The "Use Project properties" feature is a powerful time-saver. It intelligently pulls relevant details from the original project—like Contact, Account, Site, the default Project name (derived from the site), Sales person, Bid due date, Tags, and Lead Source—to pre-fill the new project form, minimizing manual data entry and reducing errors.
Observe that the relevant fields in the New project form are now populated with information from the source project.
Expected Outcome: The new project form fields are pre-filled, ready for your review and any necessary adjustments. The estimate's services, units, rates, and pricing will be copied as-is.
3. Review and Finalize the New Project
With the project details largely populated, you're just a few clicks away from creating your new project.
Carefully review all the pre-filled fields.
Modify any information as required for this specific new project. For instance, you might want to assign a different Project Manager, adjust the Project name, or update the Bid due date.
Once you are satisfied with all the details, scroll to the bottom of the modal and click the Create button.
Expected Outcome: A new project is created. This new project will include a copy of the selected estimate and will have its core details (like contact, site, etc.) populated based on the original project.
Troubleshooting
Issue: The "Use Project properties" link didn't populate all the fields I expected.
Solution: This feature can only copy information that exists in the source project. Double-check that the original project has complete and accurate data in fields like Contact, Account, Site, Sales user, etc.
Issue: The copied estimate's pricing or services aren't quite right for the new project.
Solution: The "Copy to project" function duplicates the estimate's line items, rates, and pricing exactly as they are. After the new project is created, navigate to its Estimates section. You can then edit the copied estimate to make any necessary adjustments to services, quantities, or pricing.
Issue: I actually wanted to copy the estimate to a project that already exists.
Solution: The "Copy to project" modal also supports this. Instead of filling out the New project section, use the Existing project field at the top of the modal. Select your target project from the dropdown list and click Continue. The estimate will be added to that existing project.