Map Count
Last updated: August 7, 2025
Watch Video Demo Here
Overview
The Map Count tool is a powerful feature designed to help you accurately quantify individual items directly on your project map. This is invaluable for tasks like counting bollards, light fixtures, or any distinct elements that need to be included in your estimate. By visually placing markers, you ensure precision and can seamlessly integrate these counts into your service items, which then reflect accurately in your estimates and proposals. This structured approach simplifies complex takeoffs and reduces the risk of errors.
Insight: The Map Count tool bridges the gap between visual site assessment and precise, itemized estimating, ensuring nothing is missed and enhancing the professionalism of your proposals.
Step-by-Step Guide

1. Activating the Map Count Tool and Adding Your First Count Set
To begin, you'll first need to define the general area on your map if you haven't already (e.g., "Parking Lot Area"). With your primary map element selected or while viewing the map:
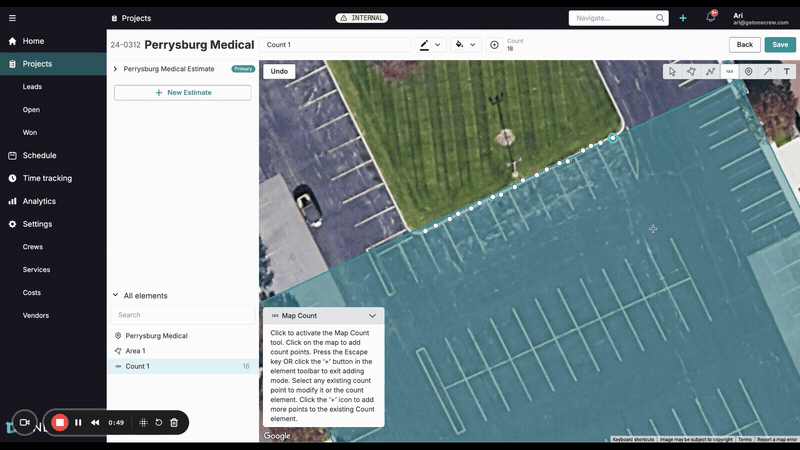
Select the Map Count tool from the map editing toolbar (it often looks like an icon with "123").
Zoom into the desired area on your satellite map.
Click on the map at each location where an item needs to be counted. Each click will place a marker and add to the current count set. You'll see a "Count 1" (or similar) appear in the All elements panel on the left, with the number of points updating in real-time next to it.
Continue clicking until all items for this first set are marked.
To finalize this set and stop adding points, you can press the Escape key or select a different tool.
2. Creating Additional Count Sets
You may need to count items in different locations or group similar items separately.
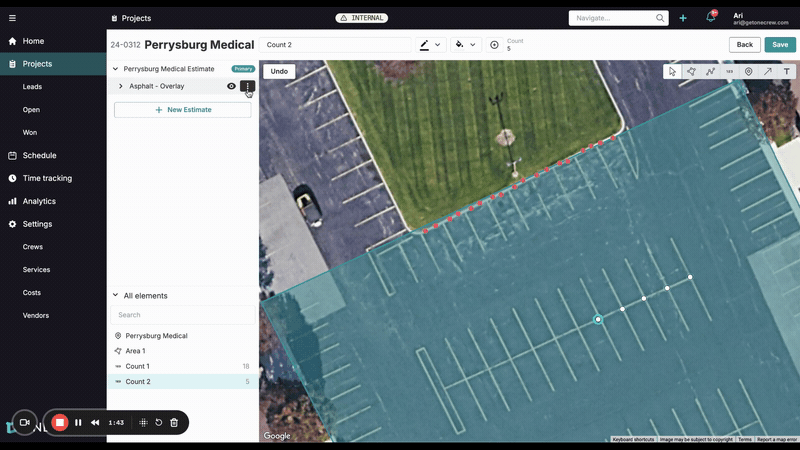
Ensure the Map Count tool is still active (or re-select it).
Simply start clicking on a new area of the map where you want to begin your next count.
A new count set (e.g., "Count 2") will automatically be created in the All elements panel, independent of the first.
Continue adding points for this new set. You can create as many distinct count sets as needed.
3. Customizing Count Sets

For better organization and visual clarity, especially on complex maps:
Select a Count Set: Click on a count set name (e.g., "Count 1") in the All elements panel, or click on one of its markers on the map.
Change Appearance: Once selected, a toolbar will appear above the map. Use the Stroke (outline color) and Fill (marker color) options to customize the appearance of the markers in that set. You can also adjust opacity and line weight.
Rename Sets: Click the three dots next to a count set in the All elements panel and choose Rename. Give it a descriptive name (e.g., "Front Parking Bollards").
Modify Points:
To delete an individual point, select it directly on the map, and then click the delete (trash can) icon in its specific toolbar.
To delete an entire count set, select the set in the All elements panel, click the three dots, and choose Delete.
Add to an Existing Set: If you need to add more points to a set you previously created, select it from the panel. Then, click the Add to count (plus icon) button in the toolbar above the map and start clicking to add more markers to that specific set. Press Escape when finished.
Pro Tip: For complex sites, use distinct colors for different count sets. This makes your Project Map in proposals much easier for clients to understand at a glance.
4. Linking Counts to Services in Your Estimate
To ensure your counts are reflected in your project's financials:
In the All elements panel, select the main map element these counts fall under (e.g., "Asphalt - Overlay" or the overall site area).
Click the three dots next to it and select Add service.
From the Select service dropdown, choose the appropriate service item (e.g., "Bollards - Install"). Ensure this service uses a unit of measure like "Each" (ea) or another count-based unit. Click Add.
The service will appear under the map element. Now, drag and drop your count sets (e.g., "Count 1", "Count 2") from the All elements panel onto this newly added service.
The total quantity for that service will automatically update to the sum of all linked counts (e.g., if Count 1 has 18 items and Count 2 has 5, the service will show 23).
Click Save in the top right corner of the map view to save all your changes.
5. Reviewing Counts in Estimates and Proposals
Once saved and linked:
Navigate to the Estimating tab or section for your project.
You will see the service (e.g., "Bollards - Install") with the total calculated quantity from your map counts. Clicking on the measurement (e.g., "23 ea") will often show a breakdown of which count sets contribute to that total.
If you include a Project Map section in your proposal, these count markers will be visually displayed, providing clear documentation of what's being quoted.
Troubleshooting
Accidentally added too many points?
Select the specific point on the map and click the delete (trash can) icon that appears in its toolbar. For the very last point placed, an Undo button might also be available.
Counts not appearing in the estimate?
Ensure you've linked the count sets to the correct service item (Step 4).
Verify the service item's unit of measure is set to "Each" or a similar count-based unit.
Make sure you have clicked the main Save button on the map page after making changes.
Want to add more points to an existing count set instead of creating a new one?
Select the desired count set from the All elements panel.
Click the Add to count (plus icon) button in the toolbar above the map.
You can now click on the map to add more points to that specific set. Press Escape when done.
How do I stop adding points or exit the Map Count tool?
Press the Escape key on your keyboard.
Alternatively, you can select a different tool from the map editing toolbar.