PDF Takeoff Overview
Last updated: December 10, 2025
Watch Video Demo Here
Overview
Plan Takeoff is a powerful feature designed to streamline your estimation process by allowing you to perform digital takeoffs directly from uploaded project plans. Whether you're working with blueprints, PDF documents, or image files, Plan Takeoff enables you to make precise measurements for areas, lengths, and counts. This digital approach enhances accuracy, reduces manual errors, and provides a clear visual basis for your estimates, ultimately saving time and improving project planning.
The core benefit of Plan Takeoff lies in its ability to translate visual information from a static plan into quantifiable data that seamlessly integrates with your project estimates. This means less guesswork and more data-driven decisions, leading to more competitive bids and better project outcomes.
Insight: Plan Takeoff transforms static blueprints and PDFs into dynamic, measurable assets, directly linking visual plans to actionable estimate data.
Configuration
Configuring and using Plan Takeoff involves uploading your plan, setting the scale, and then utilizing the drawing tools to measure elements. These measurements can then be directly linked to your project estimates.
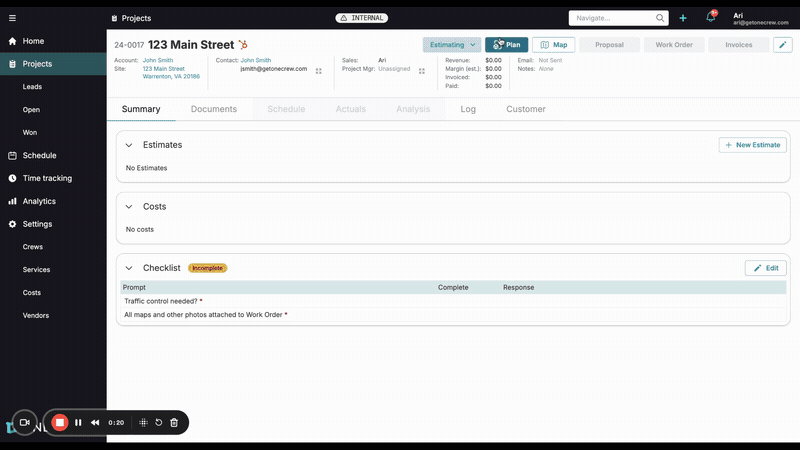
Uploading and Navigating Your Plan
Within a project, click the Plan button located in the top navigation bar, typically alongside options like Map and Proposal.
The plan interface will open. You can either click the central area prompting "Click or drop files to upload" or drag and drop your plan file (e.g., PDF, JPG, PNG) directly onto this area.
Once uploaded, the plan will render in the main view. If your document contains multiple pages, a sidebar can be opened by clicking the page stack icon (usually on the left or top toolbar). This sidebar displays thumbnails of all pages, allowing you to easily navigate to the specific page you need to work on. You can also navigate using page arrows at the bottom of the plan view.
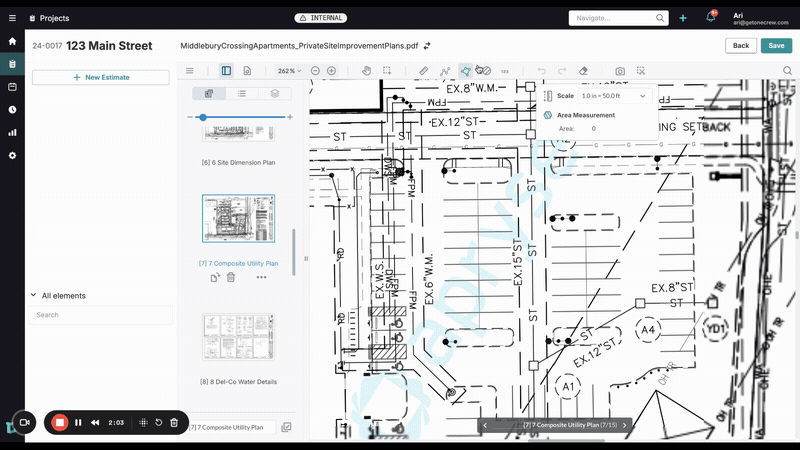
Setting the Scale
Accurate measurements depend on a correctly set scale.
Identify a known dimension on your plan. This is often provided as a graphical scale (e.g., "1 inch = 50 feet") or a labeled dimension on the drawing.
Select the appropriate measurement tool you intend to use (e.g., Area tool, Line tool). This will often reveal scale setting options.
Click on the Scale button or Add New Scale. A dialog box will appear.
You have two primary methods to set the scale:
Manual Input: If your plan states a clear scale (e.g., 1 inch = 50 feet), you can directly input these values. Enter
1in the first unit box, selectin(inches), then enter50in the second unit box, and selectft(feet).Calibrate: If you need to derive the scale from a drawn dimension, click the Calibrate button. Then, click two points on your plan that represent a known distance. After drawing the line, you'll be prompted to enter the actual real-world length of that line.
Adjust Precision if needed (e.g., to 0.1, 0.01).
Click Create or Apply to set the scale for the current plan page.
Pro Tip: Always zoom in for maximum accuracy when calibrating your scale using the drawing method. A small error in scale calibration can lead to significant discrepancies in your takeoffs.
Drawing and Measuring Elements
Once the scale is set, you can begin measuring. For example, to measure an area:
Select the Area tool from the toolbar.
Click on the plan to define the corners of the area you wish to measure. The tool often features line snapping to help you trace existing lines accurately.
As you click, the shape will form, and a live calculation of the area (e.g., in square feet) will typically be displayed by the cursor or in a small pop-up.
To complete the shape, click back on the starting point or double-click the last point.
The measured element (e.g., "Area 1") will appear in the All elements list on the left-hand sidebar, similar to how map takeoff elements are listed.
Styling and Managing Elements
Styling: Select a drawn element on the plan or from the All elements list. Use the Style (palette) icon to change properties like Stroke color, Fill color, and Opacity. This helps differentiate various takeoff items visually.
Naming: You can rename elements in the All elements list for better organization.
Integrating with Estimates
After measuring elements, create or open an existing Estimate.
Add a service line item (e.g., "Asphalt - Overlay").
To link your plan measurement:
You can drag the measured element (e.g., "Area 1") from the All elements list directly onto the relevant service line in your estimate.
Alternatively, within the service line details, click on the measurement field (e.g., square footage). A Measurements dialog will appear. Here, you can select your plan takeoff element (it will be distinguished by a small plan icon). You can also manage elements associated with this service by clicking the three-dot menu on the service line and choosing Manage Elements.
Capturing Plan Images
For inclusion in proposals or other documents:
Create Project Document from current page (camera icon): This captures the entirety of the currently viewed page of your plan, including your takeoffs, and saves it as a new document in the project's Documents tab.
Snipping Tool (scissors icon): This allows you to draw a rectangle around a specific portion of your plan to create a more focused image snippet. This snippet is also saved as a new document.
Use Cases
Plan Takeoff is an invaluable tool across various scenarios in project estimation and management:
New Construction Projects: When starting from scratch, blueprints are your primary source of information. Plan Takeoff allows you to measure foundations, flooring, wall lengths, and other critical elements directly from these architectural drawings.
Renovations and Remodels: For interior or exterior renovations, existing plans or new designs can be used to calculate materials needed for specific areas, such as paint, tiling, or landscaping.
Site Improvement Projects: When detailed site plans are available for features like parking lots, pathways, or utility layouts, Plan Takeoff provides a more granular measurement capability than satellite imagery alone.
Complex or Multi-Story Structures: For projects with multiple floors or intricate layouts, Plan Takeoff allows you to work page by page, ensuring all components are accurately measured and accounted for.
Verification and Cross-Referencing: Use Plan Takeoff to verify quantities or measurements provided by others, ensuring consistency and accuracy in project scope.
This feature is particularly useful when a high degree of precision is required, or when map-based takeoffs are not feasible (e.g., for indoor work or highly detailed new developments).
Examples
Basic Example: Measuring a Parking Lot Section
Imagine you need to estimate the cost of an asphalt overlay for a specific rectangular section of a parking lot detailed on a site improvement plan.
Upload Plan: Navigate to the Plan tab within your project and upload the PDF site plan.
Select Page: Use the page navigator to find the sheet showing the parking lot layout.
Set Scale: Locate the graphical scale on the plan (e.g., 1 inch = 20 feet). Click the Scale button, input
1inch and20feet, and click Create.Measure Area:
Select the Area tool.
Click on the four corners of the rectangular parking lot section you need to resurface.
The tool will display the calculated square footage (e.g., 11,844 sq ft). This "Area 1" appears in the All elements list.
Style (Optional): Select "Area 1", click the Style icon, and change the fill color to a semi-transparent purple and the stroke to a yellow line for clear visibility.
Integrate with Estimate:
Go to the Estimates tab and click + New Estimate, naming it "Parking Lot Overlay."
Click + Add Service and select "Asphalt - Overlay."
Click the measurement value for the Asphalt - Overlay service. In the Measurements dialog, select "Area 1" (identified by the plan icon). The 11,844 sq ft will automatically populate.
Save: Click Save on the estimate and then Save on the Plan Takeoff screen.
The estimate will now use the precise square footage from your plan takeoff for its calculations.
Advanced Example: Complex Landscaping Area and Proposal Inclusion
You are bidding on a landscaping project that includes an irregularly shaped planting bed. You need to measure its area and include a visual of this section in your proposal.
Upload & Scale: Upload the landscape plan and set the scale as described previously.
Measure Irregular Area:
Select the Area tool.
Carefully click along the curved and straight edges of the planting bed. Use more points for curved sections to approximate the shape accurately. The line snapping feature will help follow existing plan lines.
Complete the shape. The calculated area for "Planting Bed Area" is displayed.
Capture Snippet:
Zoom in on the "Planting Bed Area" on your plan.
Click the Snipping Tool (scissors icon).
Draw a rectangle around the planting bed and a little surrounding context. This creates a "Snippet" document in the Documents tab of the project.
Integrate with Estimate: Link the "Planting Bed Area" measurement to the relevant service (e.g., "Mulch Installation") in your estimate.
Add to Proposal:
Navigate to the Proposal tab and create or edit your proposal.
In the section for project documents or visual aids (often editable via Manage Docs or similar), select to include the "Snippet" document you created.
This adds a clear visual of the measured planting bed directly into your proposal, enhancing clarity for the client.
Save All: Ensure the estimate, plan takeoff, and proposal are all saved.
This advanced use case not only provides an accurate measurement for costing but also improves client communication by visually representing the scope of work within the proposal. Learn more about building compelling proposals [add link to relevant article about proposals].
Insight: Combining precise plan takeoffs with visual snippets in proposals can significantly enhance client understanding and confidence in your bid.